A recent request to a website I've been creating was to allow users to upload photos to the website, so that other users can see them. In order to do this I created this proof of concept which was easy to incorporate into my sites(s).
You can download the complete source
here:
The first step is to create a database which will store the images and the description of the image. In Microsoft SQL Server I've created a new Database named "Example" and one table named "Photos". Within this table, create three columns:
|
Column
|
Type
|
|
UniqueID
|
Unique Identifier
|
|
Photo
|
Image
|
|
Description
|
Text
|
Note: You'll need to add something like this to your Web.config file:
<appSettings>
<add key="ConnectionString" value="Data Source=*your
instance name*;Initial Catalog=Example;Integrated Security=True"/>
</appSettings>
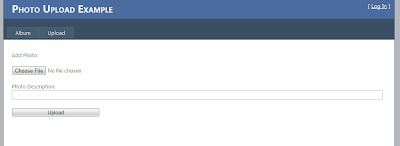
For the website, I've kept the default styles when you create a new ASP.NET Web Application, removing the two content pages that come by default and creating two new ones - 'Album.aspx' and 'Upload.aspx'. So my master page looks as follows:
 |
| The basic skeleton of site |
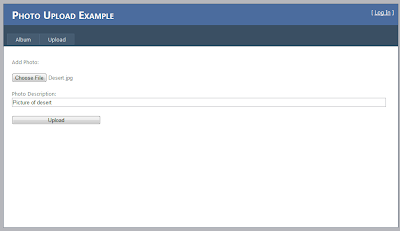
Now, lets start by allowing users to upload images. In Upload.aspx add three controls; a FileUpload control (photoUpload) to select the file to upload, a TextBox (txtDescription) to allow the description and a Button (btnUpload) to start the upload.. I'd also add a few labels to tidy it up.
 |
| Upload page |
Now for all database interaction I've created a class named DatabaseAccess to keep things tidy. This has two methods, UploadImage((byte[] imageBytes, string description) and GetPhotos().
using System;
using System.Collections.Generic;
using System.Linq;
using System.Web;
using System.Data.SqlClient;
using System.Configuration;
using System.Data;
namespace PhotoUploader
{
public class DatabaseAccess
{
private string
_connString = string.Empty;
private SqlConnection
_conn;
public DatabaseAccess()
{
_connString = ConfigurationManager.AppSettings["ConnectionString"];
_conn = new SqlConnection(_connString);
}
public void UploadImage(byte[]
imageBytes, string description)
{
_conn.Open();
string insertStatement = "INSERT
INTO Photos(UniqueID, Photo, Description) VALUES(@uniqueId, @pic,
@description);";
SqlParameter picParameter = new SqlParameter();
picParameter.SqlDbType = SqlDbType.Image;
picParameter.ParameterName = "pic";
picParameter.Value = imageBytes;
SqlParameter uniqueId = new
SqlParameter();
uniqueId.ParameterName = "uniqueId";
uniqueId.SqlDbType = SqlDbType.UniqueIdentifier;
uniqueId.Value = Guid.NewGuid();
SqlParameter descriptionParam = new SqlParameter();
descriptionParam.ParameterName = "description";
descriptionParam.SqlDbType = SqlDbType.VarChar;
descriptionParam.Value = description;
SqlCommand insertCommand = new SqlCommand(insertStatement,
_conn);
insertCommand.Parameters.Add(uniqueId);
insertCommand.Parameters.Add(picParameter);
insertCommand.Parameters.Add(descriptionParam);
insertCommand.ExecuteNonQuery();
insertCommand.Dispose();
_conn.Close();
}
public DataSet
GetPhotos()
{
_conn.Open();
string selectStatement = "SELECT
* from Photos;";
SqlCommand command = new
SqlCommand(selectStatement, _conn);
SqlDataAdapter adapter = new
SqlDataAdapter(command);
DataSet ds = new DataSet();
adapter.Fill(ds);
command.Dispose();
_conn.Close();
return ds;
}
}
}
Ideally the SQL statements would be stored procedures, but this will do for now.
Now, in the code part of Upload.aspx.cs I have the database access being constructed, and the button click event uploading the details to the database, then it automatically transfers to the Album page so you can see your image that has been uploaded:
private DatabaseAccess
_dbAccess = null;
protected void
Page_Load(object sender, EventArgs e)
{
_dbAccess = new DatabaseAccess();
}
protected void
btnUpload_Click(object sender, EventArgs e)
{
_dbAccess.UploadImage(photoUpload.FileBytes,
txtDescription.Text);
Server.Transfer("Album.aspx");
}
If you try this out you should see your database now getting populated with images.
Now we want to display the images on the Album page. To do this I have created a Web User Control which has a label (for the description) and an Image for the photo.
 |
| The basic user control - customize this to make it look great! |
We will populate this image control with every image we get returned from the database, and then add it to the album page using an generic handler. Meanwhile in the code for this user control I have the following:
public string Description { get; set; }
public Guid
PhotoID { get; set;
}
protected void
Page_Load(object sender, EventArgs e)
{
this.lblDescription.Text = Description;
this.imgPhoto.ImageUrl = "~/ImageHandler.ashx?id="
+ PhotoID.ToString();
}
What we are doing here is passing the unique id of the photo to the generic handler so that it will handle the retrieval of the image and populate it at runtime. To create the ImageHandler, within Visual Studio choose Add -> New Item -> Generic Handler and name the file ImageHandler.ashx. Within this file, add the following code:
using System;
using System.Configuration;
using System.Data;
using System.Data.SqlClient;
using System.Web;
namespace PhotoUploader
{
public class ImageHandler : IHttpHandler
{
private string
_connString;
public void
ProcessRequest(HttpContext context)
{
_connString = ConfigurationManager.AppSettings["ConnectionString"];
SqlConnection myConnection = new SqlConnection(_connString);
myConnection.Open();
string sql = "Select
Photo from Photos where UniqueID=@ImageId";
SqlCommand cmd = new
SqlCommand(sql, myConnection);
cmd.Parameters.Add("@ImageId",
SqlDbType.UniqueIdentifier).Value = new Guid(context.Request.QueryString["id"]);
cmd.Prepare();
SqlDataReader dr = cmd.ExecuteReader();
dr.Read();
context.Response.ContentType = "image/jpeg";
context.Response.BinaryWrite((byte[])dr["Photo"]);
dr.Close();
myConnection.Close();
}
public bool
IsReusable
{
get
{
return false;
}
}
}
}
What this is doing is selecting the photo with the ID we have passed it, and then will return it as bytes and will populate the image in the user control.
Now to finally tie things together, we need to add code to the Album page to load the images into a gallery. Add a panel (pnlGallery) to the content page so we can add the ImageControl's to this. We created the method to retrieve the image data earlier in the DatabaseAccess class, so we just need to call through to that, iterate through the dataset and create a ImageControl for each photo, and add it to a panel on our page.
using System;
using System.Data;
namespace PhotoUploader
{
public partial class WebForm1 :
System.Web.UI.Page
{
private DatabaseAccess
_dbAccess = null;
protected void
Page_Load(object sender, EventArgs e)
{
_dbAccess = new DatabaseAccess();
LoadGallery();
}
private void
LoadGallery()
{
DataSet photoData = _dbAccess.GetPhotos();
foreach (DataRow
row in photoData.Tables[0].Rows)
{
byte[] imageBytes = (byte[])row["Photo"];
string description = row["Description"].ToString();
Guid photoID = (Guid)row["UniqueID"];
ImageControl image = (ImageControl)Page.LoadControl("ImageControl.ascx");
image.Description = description;
image.PhotoID = photoID;
this.pnlGallery.Controls.Add(image);
}
}
}
}
This now completes the example - you should be able to upload images to the site and then view them in the album.
 |
| Uploading in action |
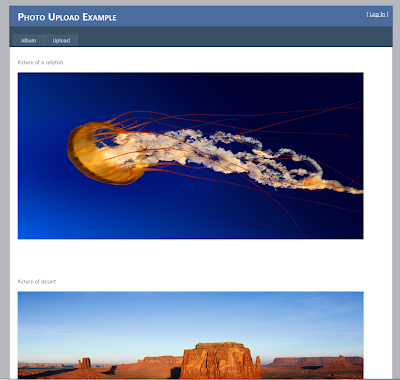 |
| The final Gallery |
If you have any questions or can correct any mistakes I've made just add a comment. :-)